

How I Made Avery's Yellow Fairy Costume


Ok, wrong season to be blogging about a Halloween costume. But we’ve been busy, winter flew by, and somehow it’s nearly spring. And what’s more springy than a butter-yellow, nature-inspired fairy costume? Bam! Off-season blog post justified.
Since she learned to talk, Avery made it clear that she was all about yellow, so it made sense that her third Halloween costume would be an variation on that theme. So I raided my stash for all of the yellow remnants I could find. Fortunately I bought a lot of yellow fabric back in my hoarding days, including a beautiful piece of marigold silk from The Fabric Store, some leftover cotton gauze from my Stevie blouse, and some scraps I had leftover from other projects. I only had to purchase some additional fabric for the wings, which required something stiff and gauzy. Here’s a recap of my process:
Inventory, plan, sketch
As I mentioned above, I took stock of the fabric I already had to avoid buying too much more. I then sketched out plans for the skirt (self-drafted and fairly simple) and determined that I would need to purchase a pattern for the top. I decided to attach the wings to the top/ vest so that I wouldn’t have to add additional straps (which I thought would disrupt the lines and look a little funky), so had to create a sturdy, heavier top to accommodate them.
I took a little trip to Joann’s and settled on Simplicity 1786 — a simple vest that I could easily alter to include Velcro closure. For the wings, I planned to use a technique I learned making costumes in high school theater: basically, a big wad of gauzy synthetic shaped into four wing-shaped bows and supported by light jewelry wire.

Prepare and Cut the Fabric
For the skirt, I used cardstock to create a simple template, and cut out about fifteen “petals,” alternating between leftover rayon and marigold silk that I found at The Fabric Store a few years back. I wanted the rayon to match the silk a bit more closely, so I used turmeric to dye both fabrics and get them a little closer in tone. I’m not a natural dye expert by any stretch, but I found that turmeric tea + extra powdered turmeric + hot water, soaked for about 15 minutes and rinsed, worked well. I used a serger to finish each petal before dying them, so the thread ended up matching, too.
I decided to line the vest instead of using bias tape. This of course made the process more complicated and required cutting double pieces (cotton gauze and rayon), but it made the final piece sturdy enough to balance the wings that would be attached later.


Sew and ASSEMBLE
The vest was fairly easy to assemble, but the skirt took a little more finessing. After attaching each petal to the waste band, I folded and inserted the elastic, but boy howdy that took about 45 minutes (I despise inserting elastic—I still haven’t figured out how to do it efficiently).
I’m not sure how to describe the wing-making process (I probably should have made a video), but basically for each wing I folded a large rectangle of fabric, inserted a string of medium-weight jewelry wire at the fold, then molded it into a leaf shape cinched at the base. Once all four were complete, I attached them at the back center of the vest, covered with a small circle of the cotton gauze, then finished with marigold embroidery thread (see pictures below).
I used fabric scraps, naturally molted feathers, and a single seashell to created the hairpiece, which I held together with embroidery thread and a hot glue gun.
All in all, it turned out pretty epic, and Avery was the happiest (and possibly only) little yellow fairy in town.


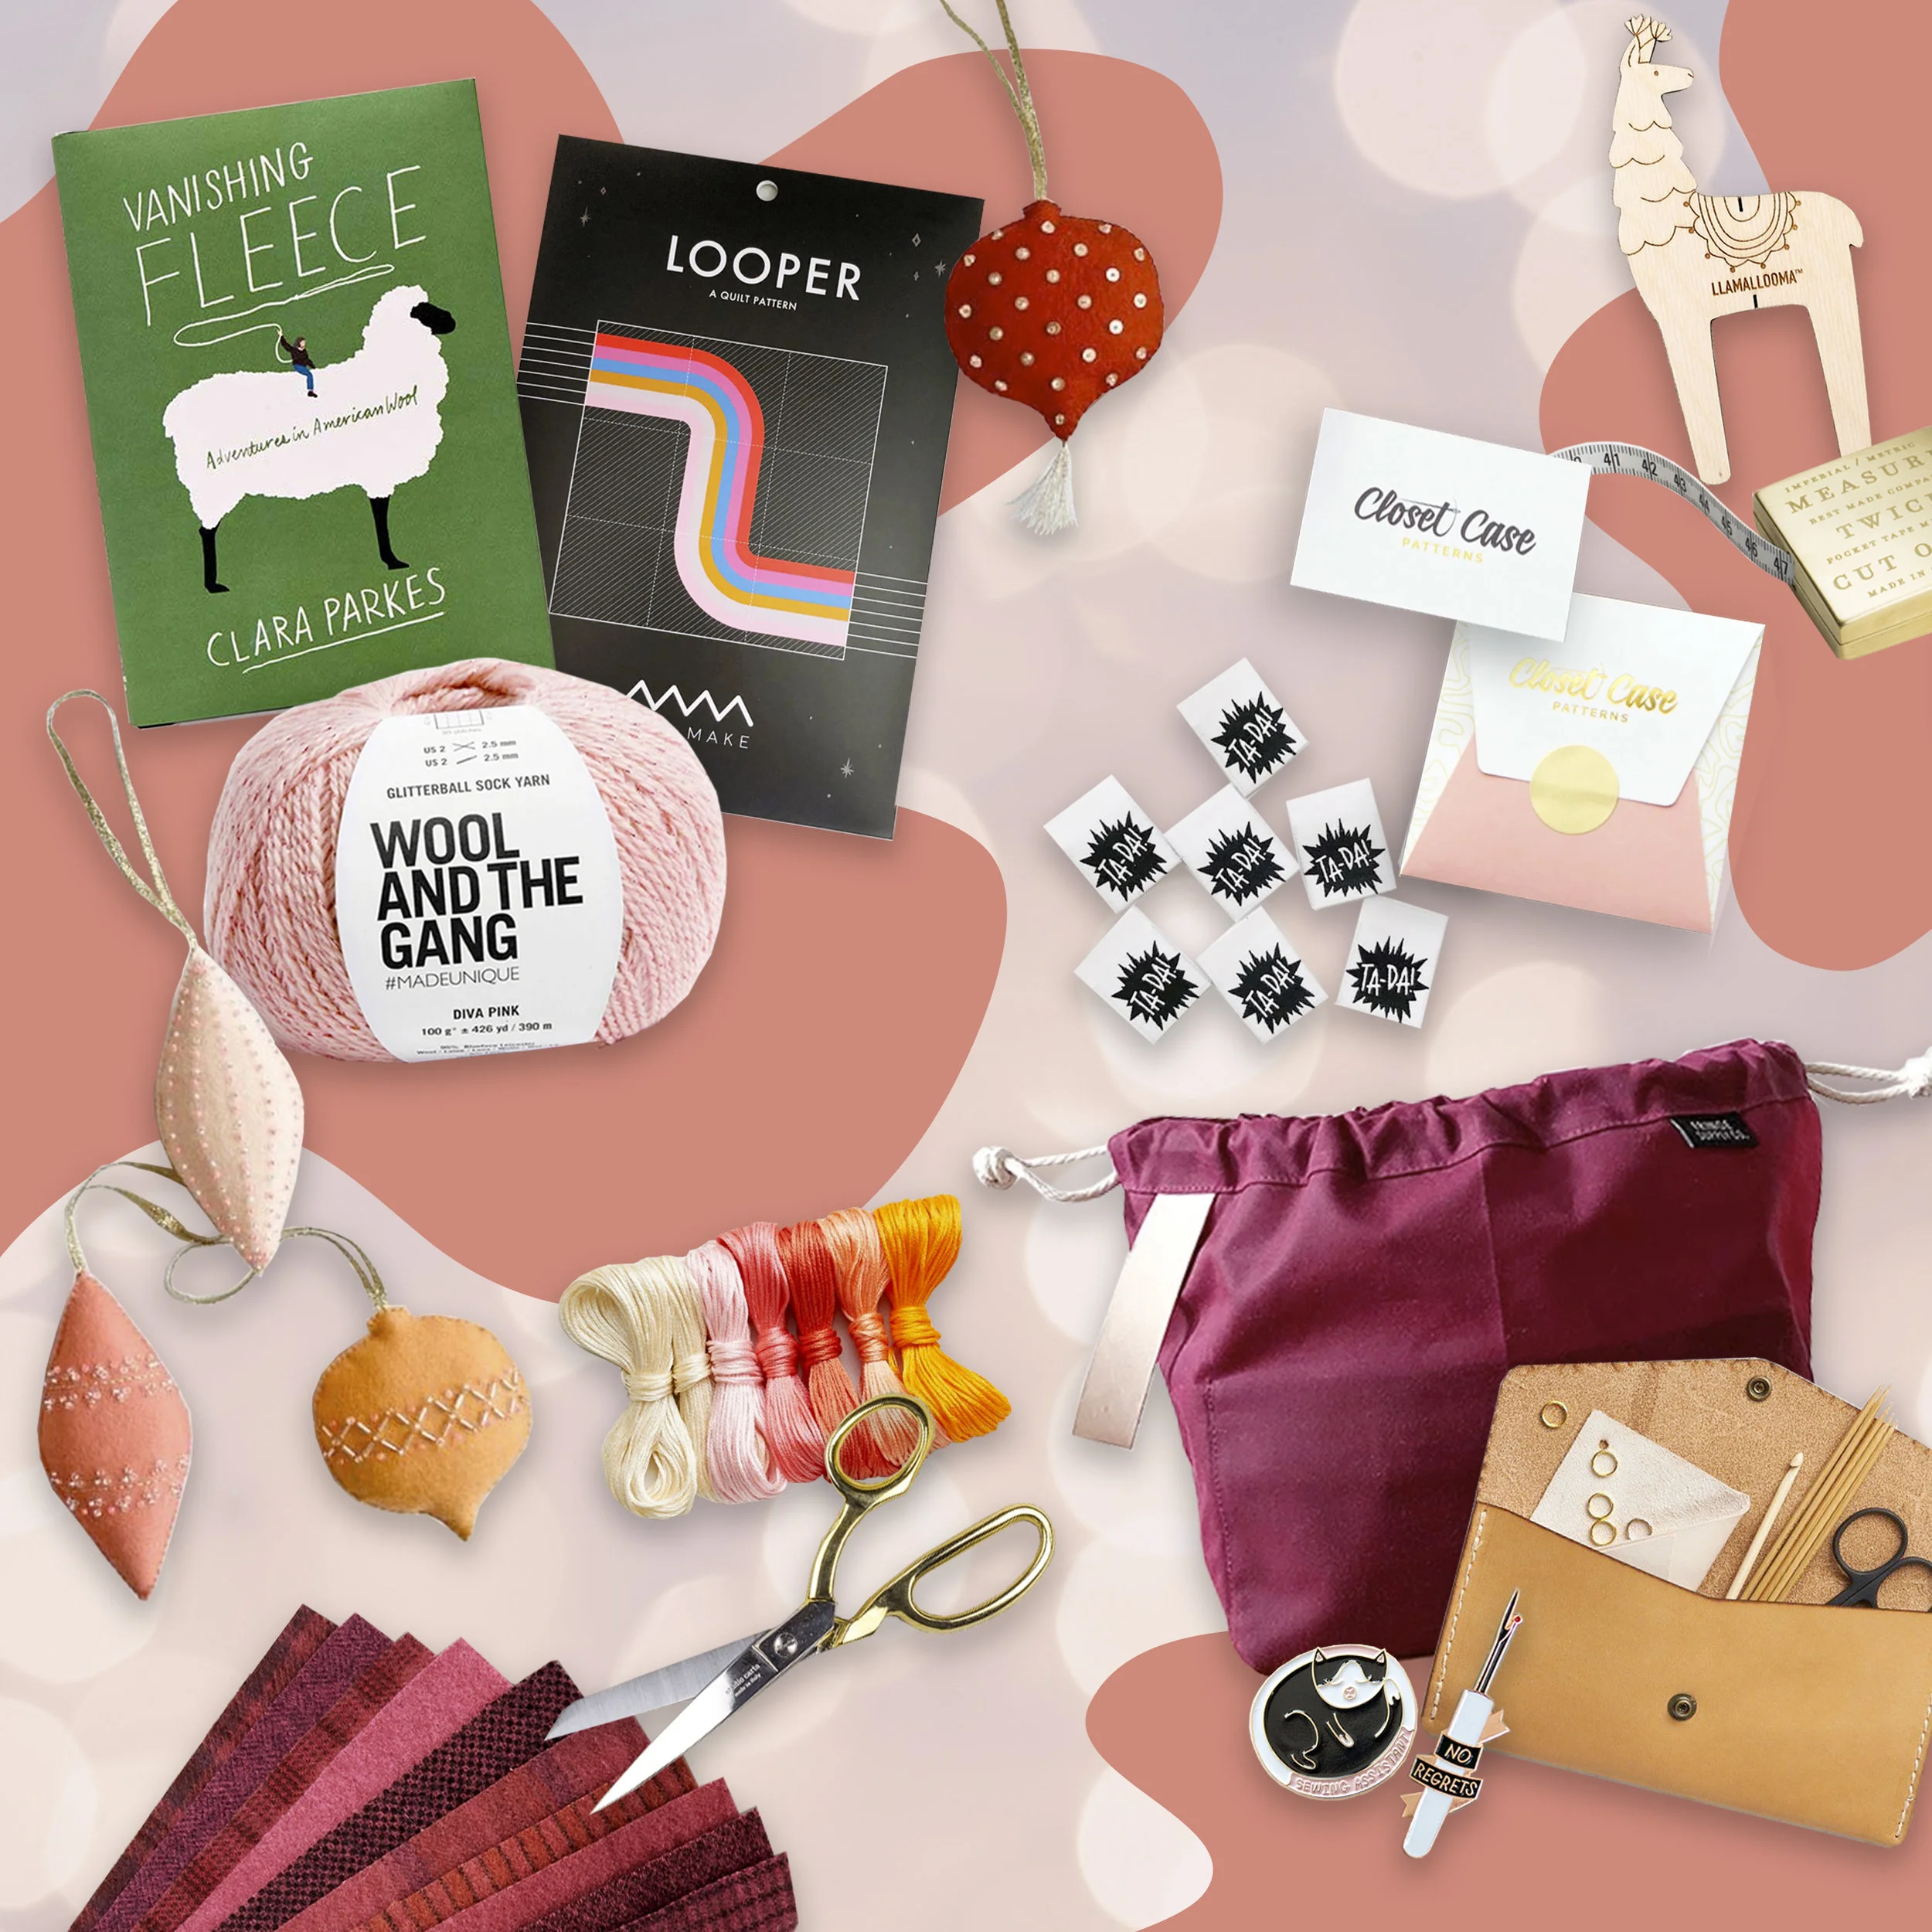
Sustainable Gifts for People Who Sew, Knit, and Craft
This list of list slow-made, sustainable, indie-focused holiday picks is sure to get your crafty friend or loved one thinking, organizing, and creating.

It’s no secret that I love to make stuff and that I’m a giant sentimental nerd when it comes to the holidays (having a kid has only exacerbated the problem). But I do try to be conscientious about the impact my crafting and holiday-ing has on people and the planet. As the sewing community becomes more and more focused on sustainability, it’s likely that the maker in your life has similar concerns. So I put this list slow-made, sustainable, indie-focused holiday picks that are sure to get your crafty friend or loved one thinking, organizing, and creating.

Waxed canvas Field Bag by Fringe Supply Co.
$77.90 at A Verb for Keeping Warm
This sturdy durable bag features lots of storage, a vegetable-tanned leather carry loop, and cotton drawstring. Made in the USA from sturdy waxed cotton canvas, it’s a great solution for knitters and other makers frequently on the go.

Vanishing Fleece: Adventures in American Wool
$17.99 at Amazon
In her latest book, knitter and writer Clara Parks details her adventures transforming a 676-pound bale of fleece into saleable yarn, and the people and vanishing industry she discovered along the way. Great for the knitter in your life — or anyone who loves a good nonfiction read.
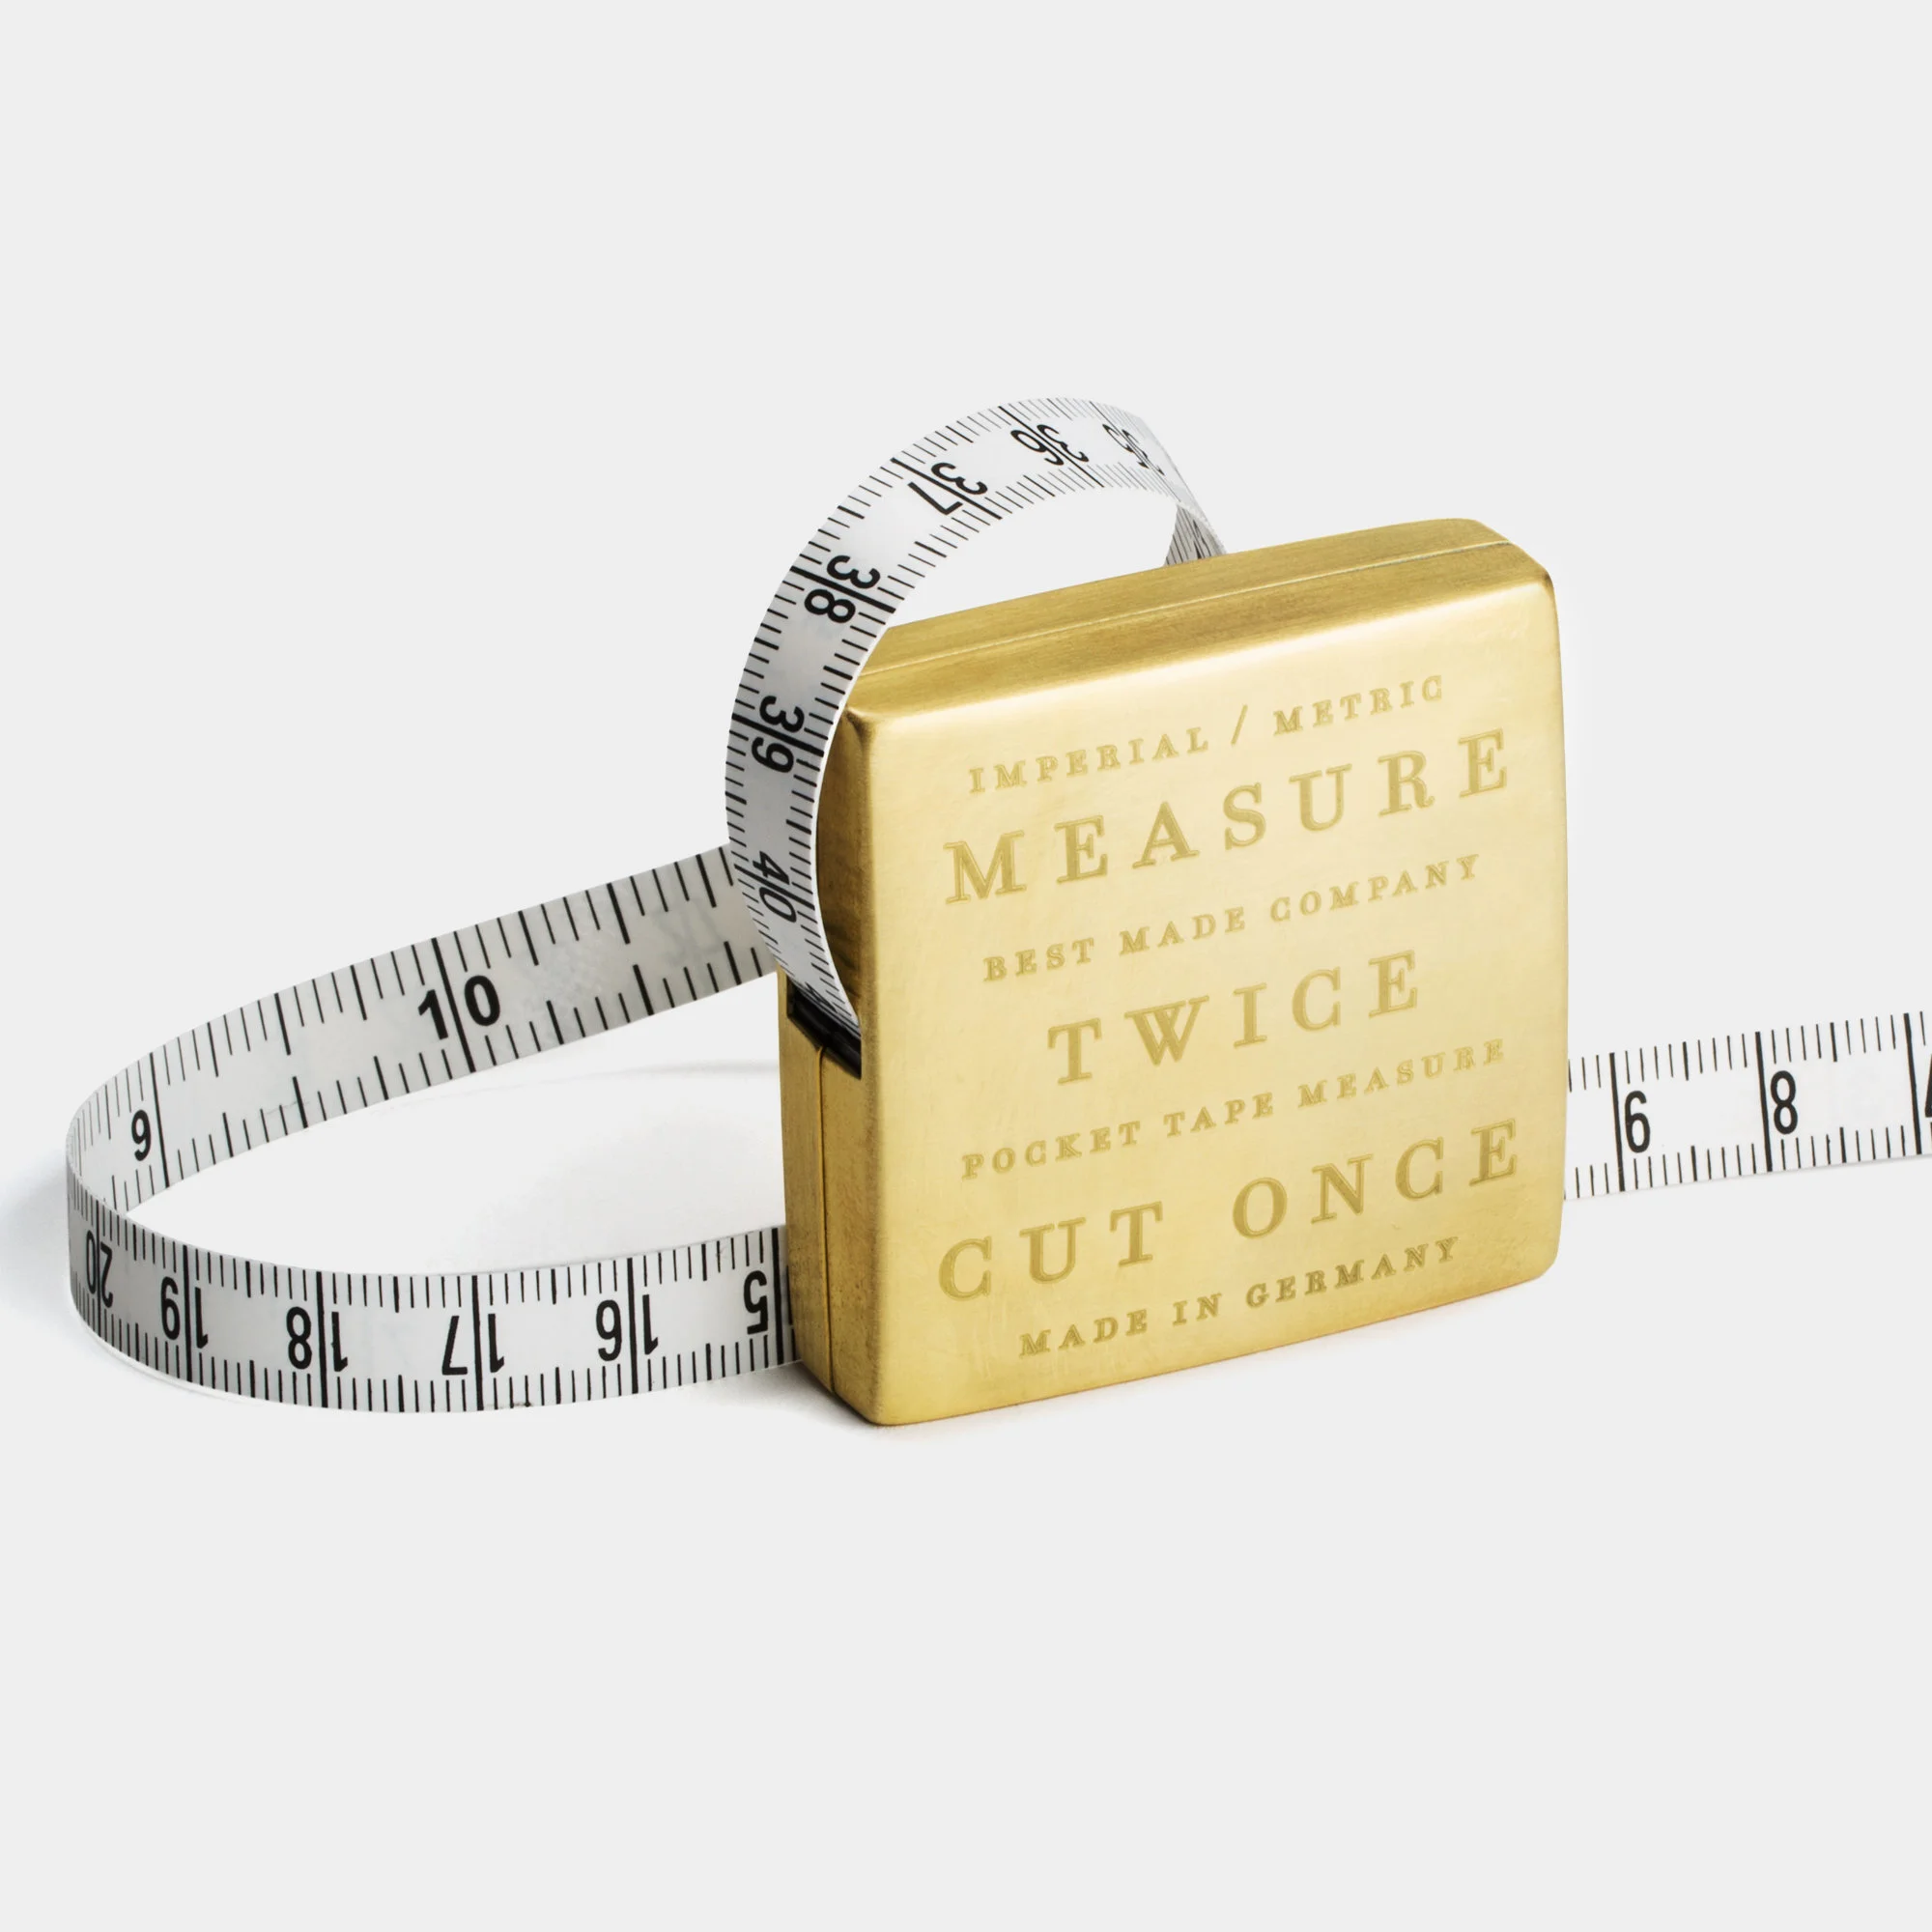
“Measure Twice, Cut Once” Solid Brass Measuring Tape
$58 from Best Made Co.
This is more of a “for the maker who has everything” gift because —let’s be honest— $58 is a lot to spend on a tape measure. But its durable, solid brass case (made in Germany) and timeless message is sure to make this one a hit.

studio carta Dressmaker Shears
$52 at Studio Carta
These dressmaker shears are functional and pretty as heck. Crafted in Italy with hard-tempered steel, sharp serrated blades and a 24-karat gold-plated handle, these shears are an heirloom in their own right.
Note: If you’re looking for a less expensive option, I always recommend the Japanese-made Kai shears. They really are the perfect scissors.

Wool and the Gang Glitterball Sock Yarn
$20 at Wool and the Gang
In general, sparkles aren’t super sustainable. But this British sourced and spun yarn is a mix of 100% naturally renewable wool and lurex offers a good compromise. Produced by eco-conscious suppliers, this extra soft wool has a subtle hint of holiday glitz.

Fringe leather tool pouch by Fringe Supply Co.
$64 at Fringe Supply Co.
Handmade in Denver, Colorado, this simple leather envelope pouch holds tools, spare needles, and all other wayward supplies. The pouch features undyed, waxed cotton stitching, an antiqued-brass snap, and natural vegetable-tanned leather.

Purl Soho Heirloom Wool Ornament Kit
$98 at Purl Soho
My grandmother made several sets of felt Christmas ornaments that have been distributed among her twelve (!) children—and children’s children—for years. I managed to acquire a couple of them and they’re one of the best parts of trimming the tree. Use this kit to make ornaments for your loved ones, or give the whole kit to a crafty someone in your life! The kit includes 100% wool felt pieces, cotton thread, needles, beads, sequins, and everything else you need to complete the project.
Purl Soho also sells beautiful felted wool bundles — great for stuffing those stockings!

Miss Make Looper Quilt Pattern
$16 at Miss Make
I am in love/ awe of this recent quilt pattern release by Devon Iott of Miss Make. I’m not a super skilled quilter, but if I was I would absolutely put this pattern on my list. The Looper includes modular blocks that can be rearranged in any direction to create a continuous design. A perfectly modern, perfectly accessibly, perfectly perfect pattern.

Llamallooma Pom-Pom Maker
$15 at Fancy Tiger Crafts
Know anyone obsessed with pom poms? Empower them to make their own with the the Llamallooma from Betz White. Made from baltic birch, the loom is easy to use and cute as all get out. Pair it with some US-grown yarn for the perfect stocking stuffer.

“Ta Da” Woven Labels by Kylie and the Machine
$8.50 at Fancy Tiger Crafts
Oeko-Tex certified in plastic-free recycled packaging, these labels let the sewist in your life do a little humble-bragging.
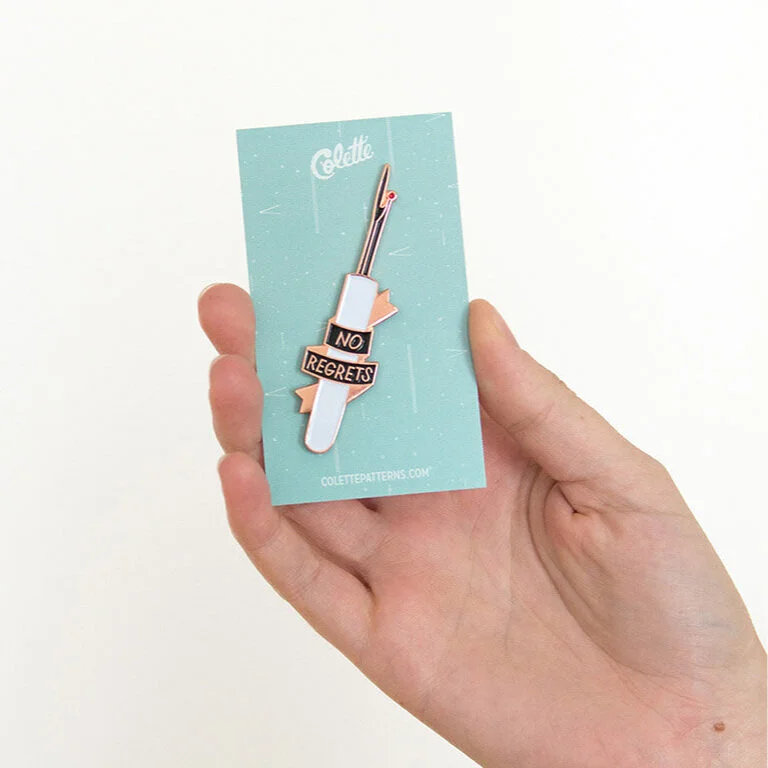
Colette Patterns Enamel Pins
$8 at Colette Patterns
These cute little sewing-themed pins make great stocking stuffers. Each pin features a beautiful rose gold finish.

Closet Case Patterns Gift Card
$25 increments at Close Case Patterns
You can never go wrong with a gift card, especially to one of the best indie pattern makers out there! This Closet Case Patterns gift cards are printed on beautiful rose and gold cardstock. Or purchase a digital version to curtail that carbon footprint.
Disclosure: This post is not sponsored, but I do make commission via Skimlinks. Thanks for supporting Birds of a Thread!
Like what you read? Give it a share!


Awkward Skirt to Fitted Top: A Fall Refashion


Holy moly, it’s been a while! During which time I’ve:
Moved to San Diego with Jon and the kiddo
Started a new role as a Communications Manager at a tech company
Contemplated whether or not to keep blogging at all (see: aforementioned cross-state move and new, demanding role)
If you follow on Instagram, though, you’ll know that I’ve squeezed in a few sewing projects, including a recent refashion of a piece I’ve had sitting in my “don’t-get-rid-of-just-yet” pile. I bought this linen midi-length skirt at Madewell on impulse — I’d gained a few pounds, couldn’t fit into any of my work clothes, and was in a bit of a panic before starting my new job. Unfortunately I sized up a little too far, and the skirt was always too big and an awkward length (mid-calf, but not in a cute way).

I loved the texture, button loop closure, and color, so I finally decided to turn it into something wearable. Here’s a look into my process:
First, I unbuttoned the button closure, cut the skirt in half horizontally, and opened the whole thing up so I had a nice hunk of fabric to work with.
Then, I laid out the pattern pieces for a Mimi G Style pattern (Simplicity 8927), aligning the front closure with the skirt’s existing button closure. This took a bit of finessing, since the pattern was designed to self-line and included seam allowances and a tie-front feature.
Once I cut and assembled the bodice, it was about an inch too wide (partly because of the seam allowances and partly because patterns are almost always bigger than their sizing guide suggests). So I pinned it to fit and redid the side seams.


4. Even then, the bust was too big and billowed out at the armpits (not totally sure what happened here, but I suspect the linen stretched a bit). So I added in some pleats along the top of the bust line before finishing with bias tape that I made from leftover pieces of the fabric. I was running low on scraps at that point, so I made it a halter instead of attaching the straps to the back as the pattern was originally designed.

5. Because I used the existing skirt hem, there was no way to properly finish the side seams. So I added tiny patches to both sides, which I actually think adds charm and gives the top a well-loved feel.
This is probably my favorite refashion to date, and one that I’ve already worn out in the real world a few times (the true test!).


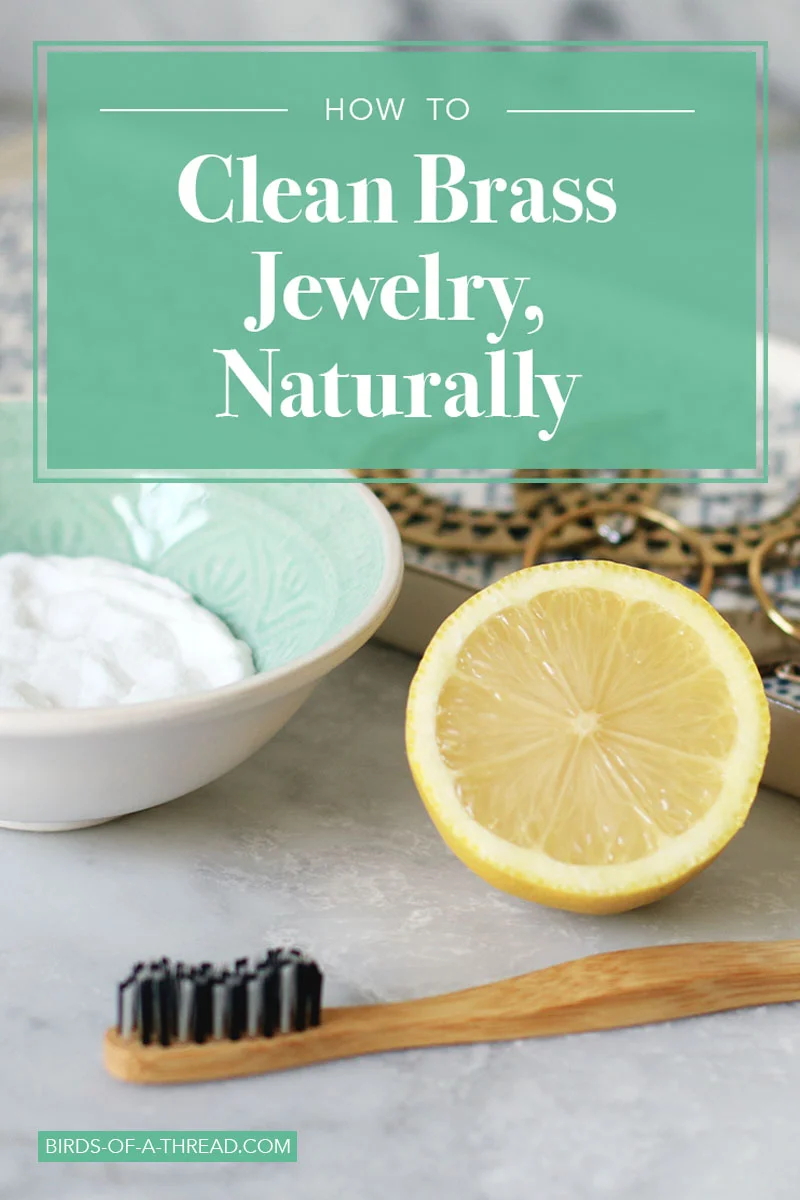
Make It New: Clean Your Brass Jewelry with Lemon and Baking Soda

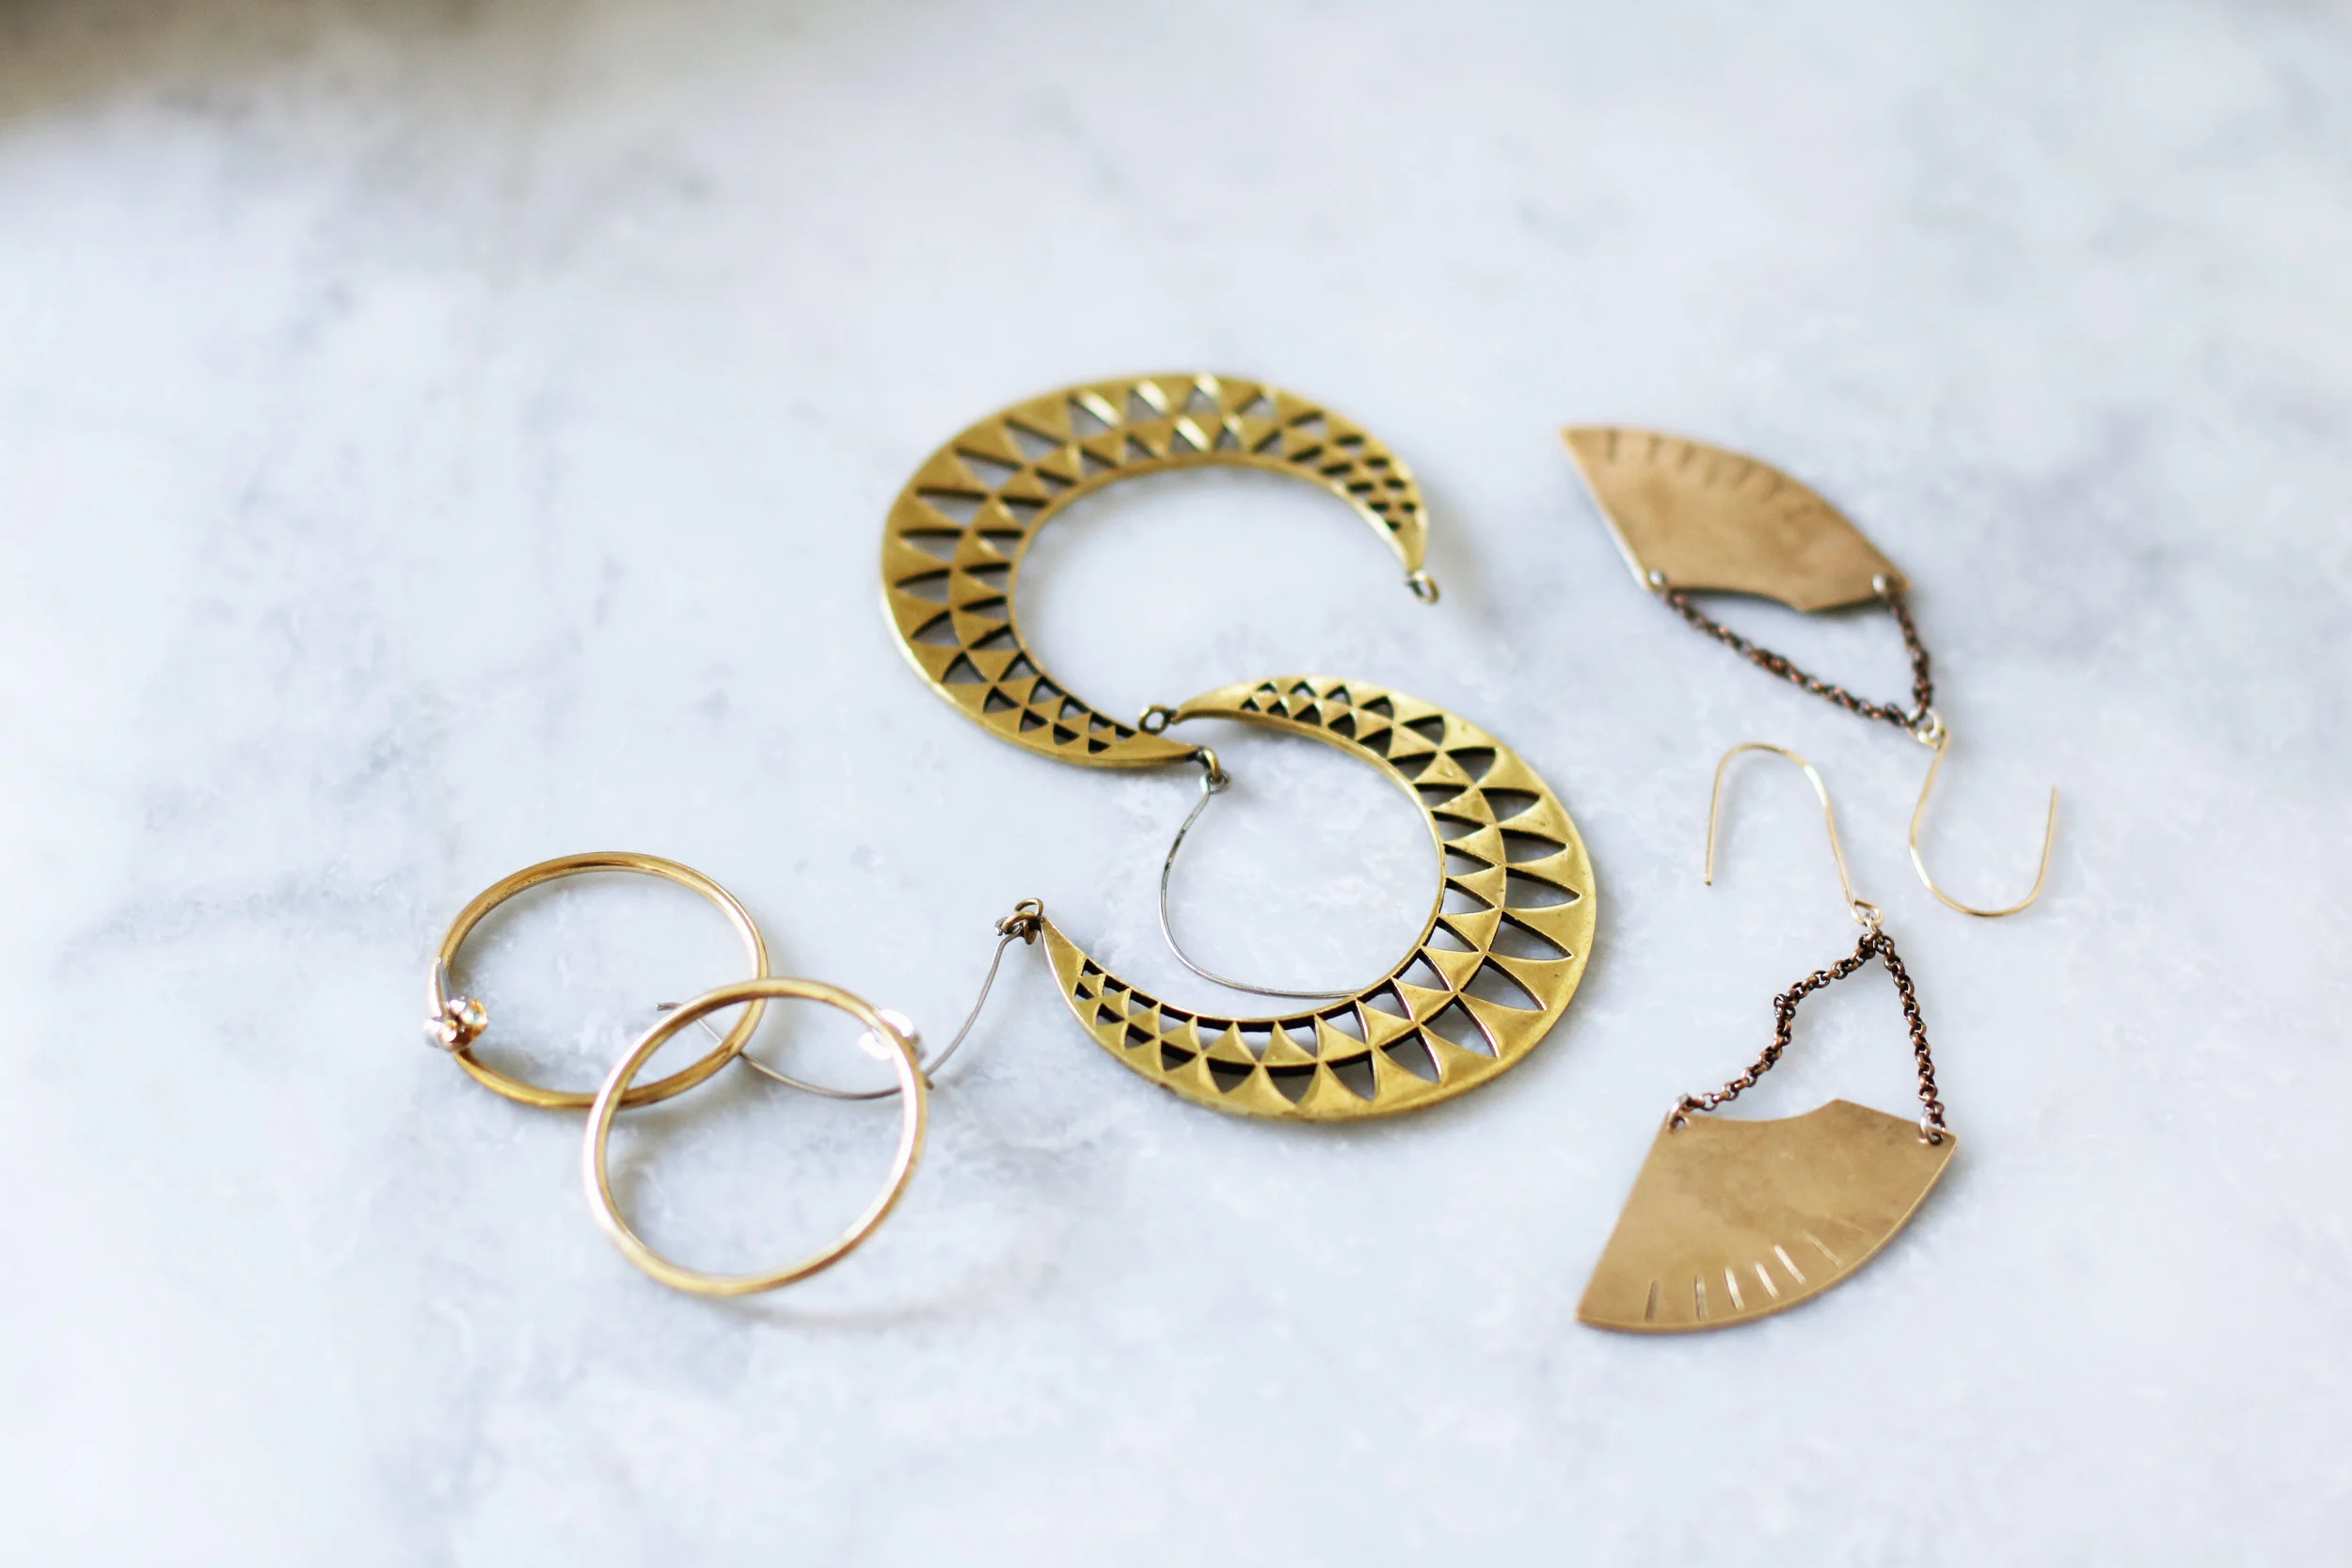
One of the goals of my six months, no shopping stint is to learn how to better care for the clothing and accessories I already have. I don't actually own that much jewelry to begin with, and usually rotate among five pairs of earrings, a necklace or two, and a couple of cuff bracelets. This works fine for me, but it does mean that I put a decent amount of wear on each piece. And my brass pieces were starting to get dirrrrty.
So I thought I'd try out a natural brass cleaning technique I've seen all over the place: lemon and baking soda. The process is pretty simple:
- Just squeeze half a lemon into a small bowl filled with 3-4 teaspoons of baking soda and stir.
- This creates a marvelous, science fair-style bubbly paste, which you then apply with an old toothbrush to your brass pieces and scrub away.
- Rinse, making sure the paste is completely removed from all the nooks and crannies, and pat dry.
- Repeat the process if needed to get your brass nice and shiny (I cleaned mine twice).
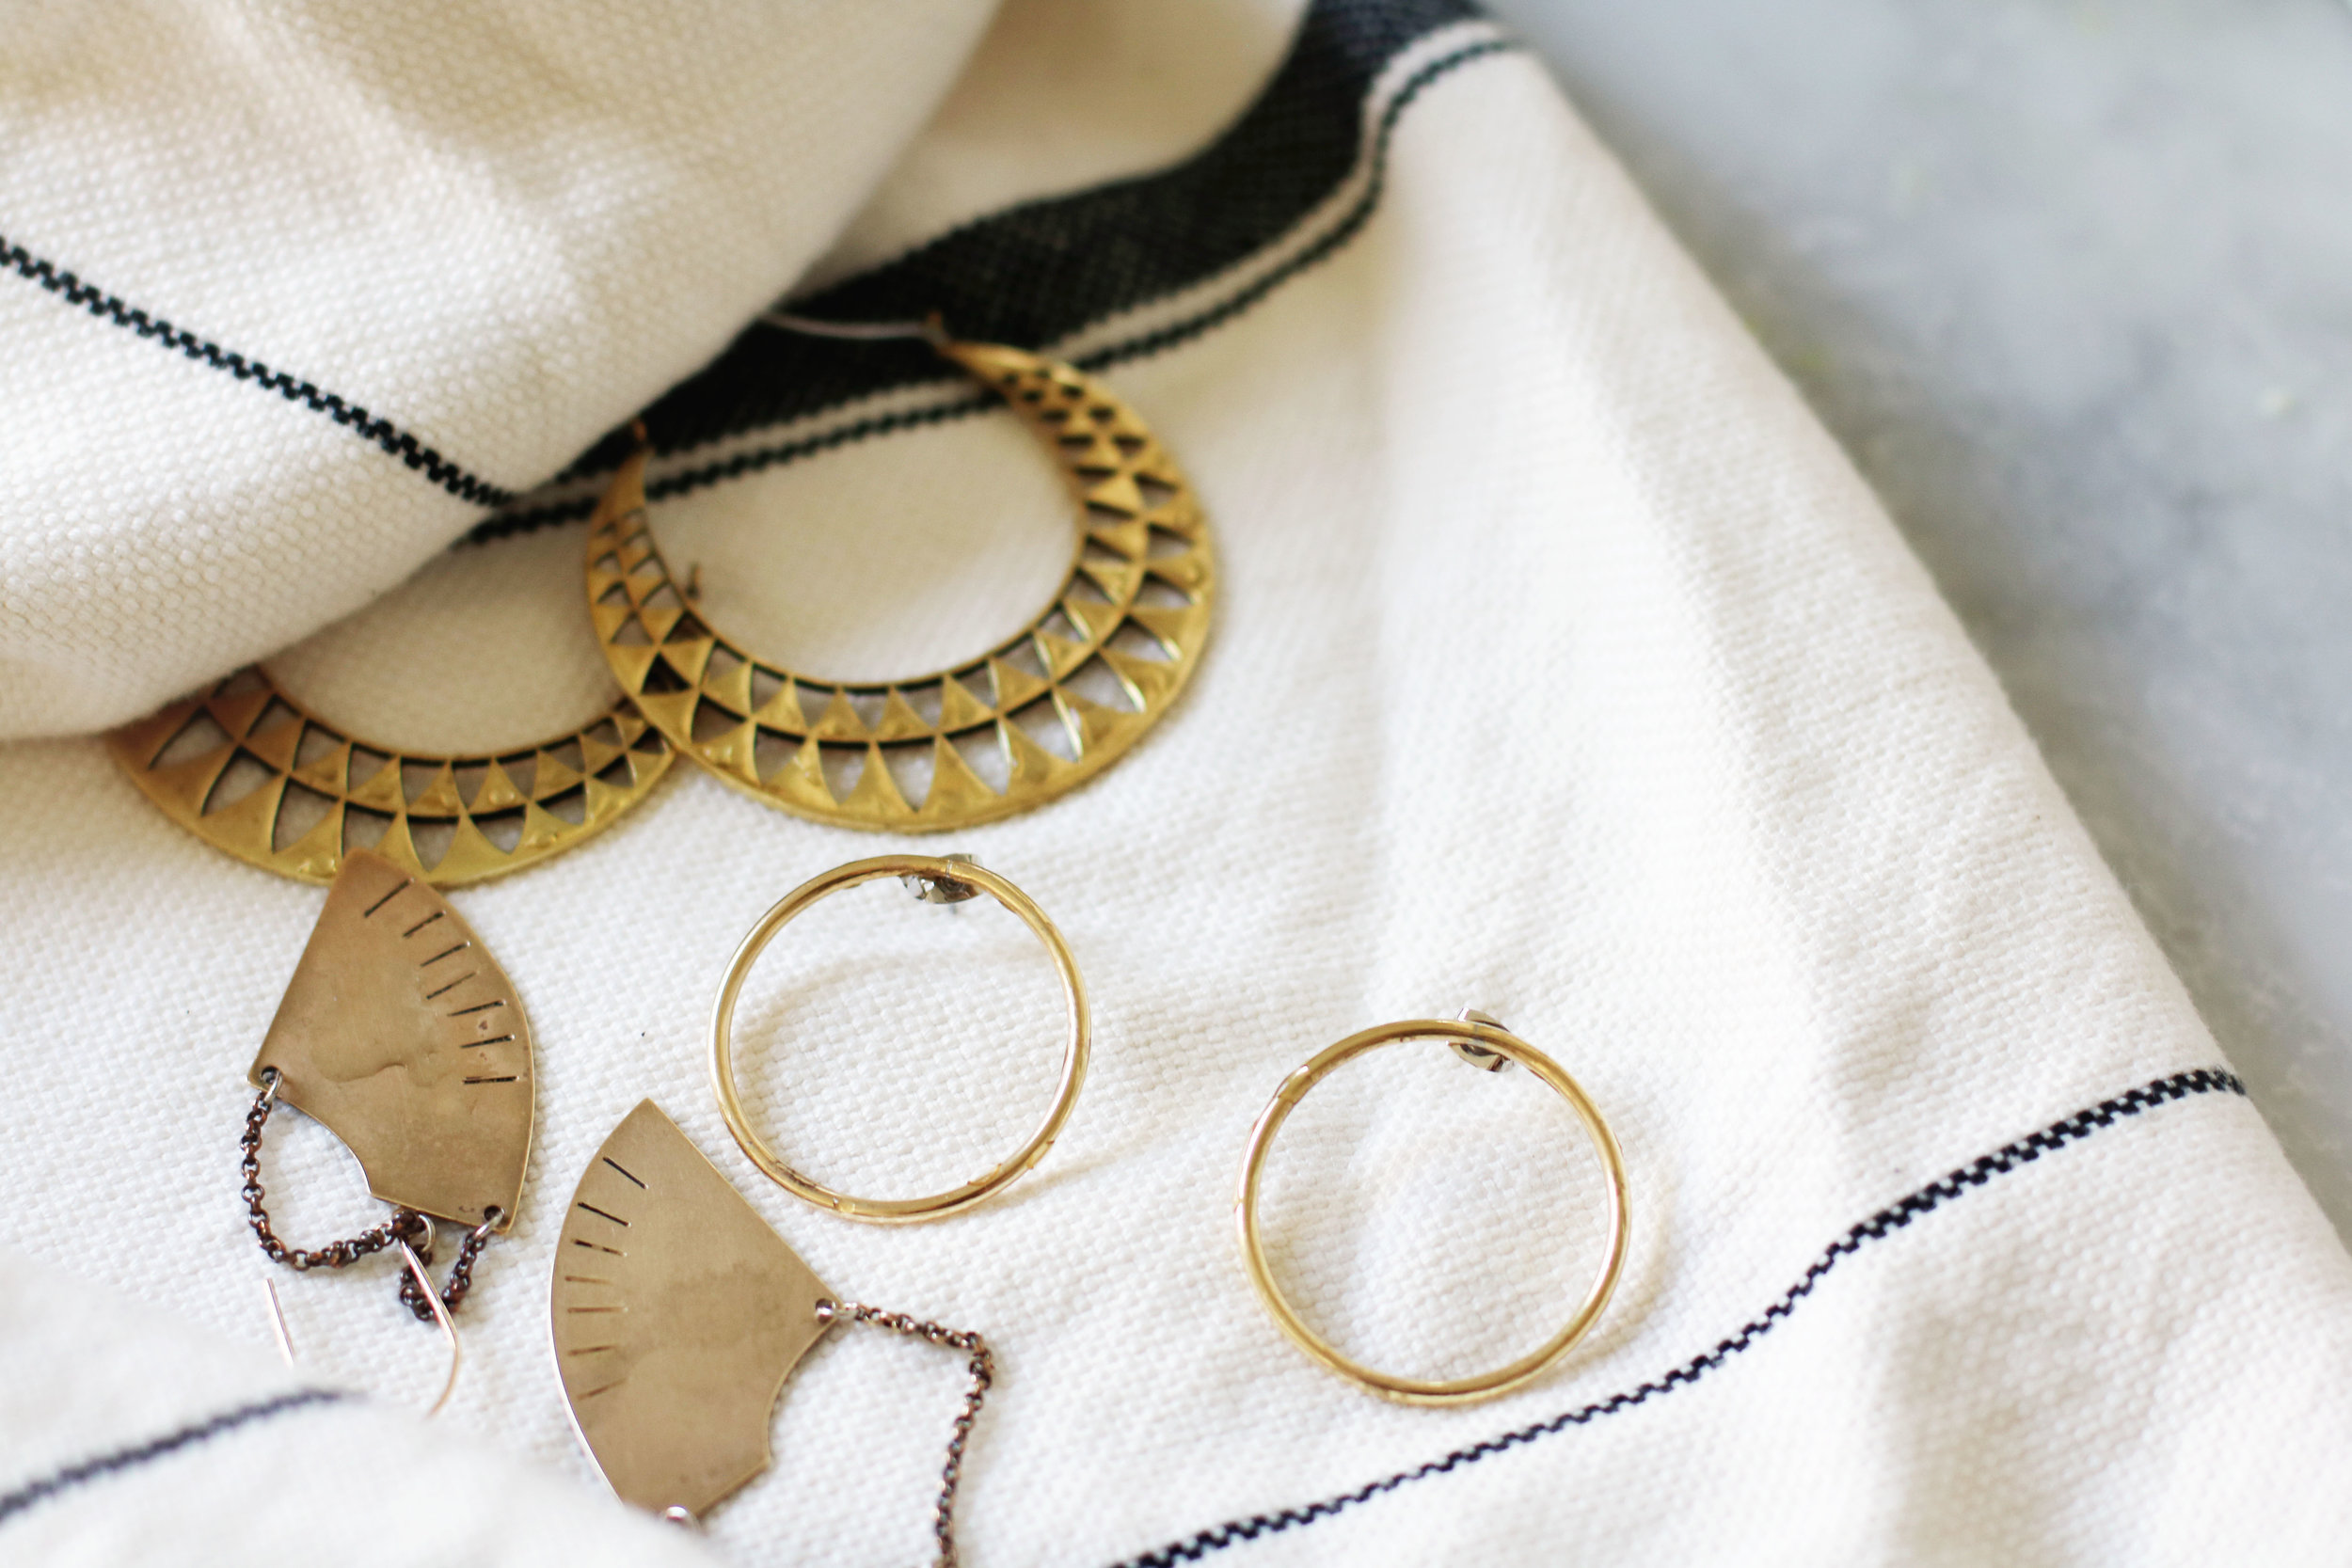
I was pretty happy with the results; the mixture cleaned and shined my jewelry nicely while still retaining some of the patina that makes brass so charming in the first place. To get all of the stains out, you may need to use a stronger solution (I've heard apple cider vinegar also works well), but I was happy with results that this method achieved. Here's a before and after shot for comparison:
Before...

after!
What are your favorite natural cleaning methods for jewelry, clothing, or other accessories?
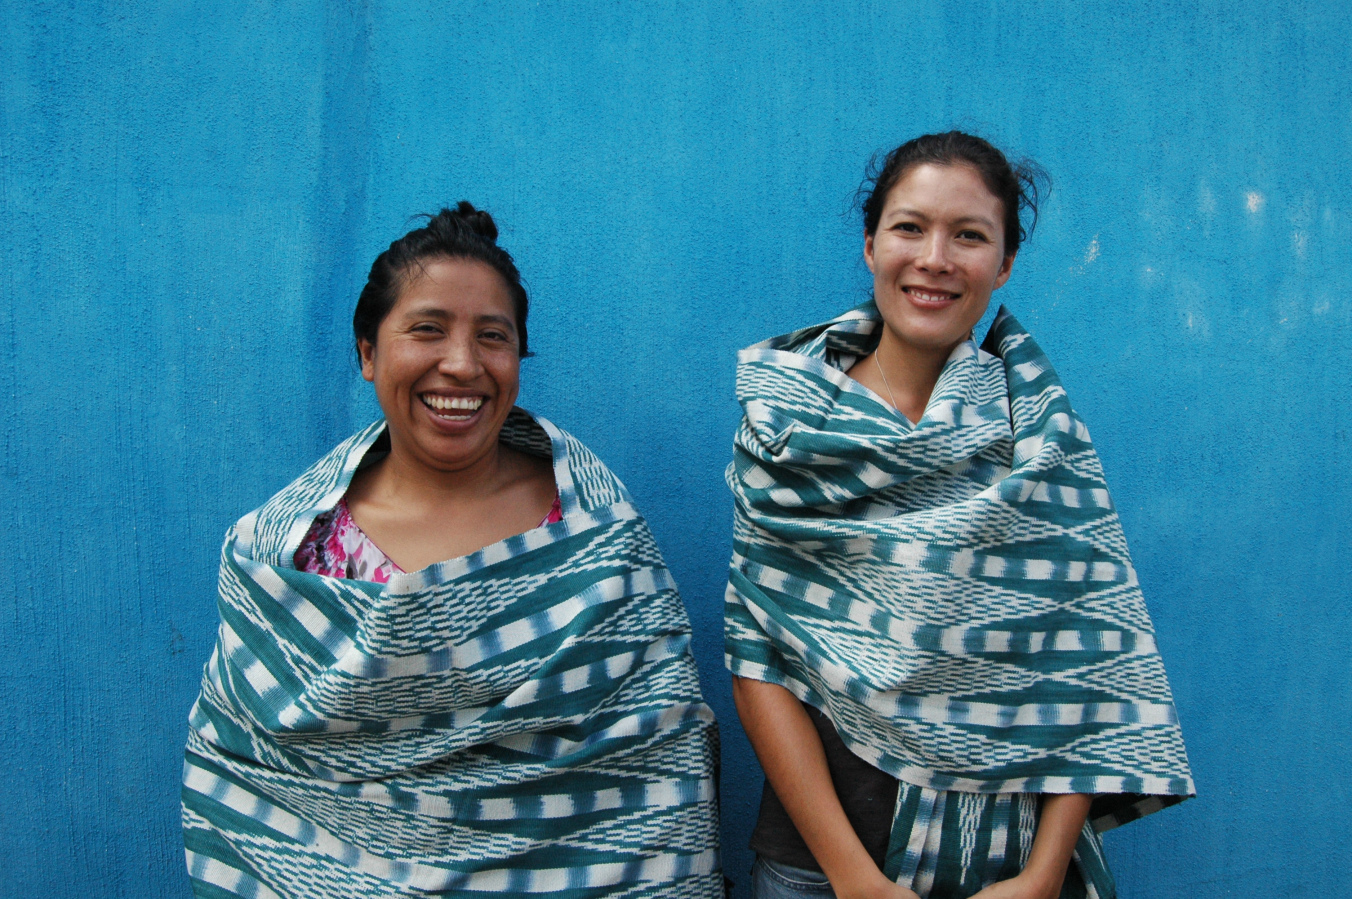
Travel Opportunity for Makers: A Creative Textile Exchange in Guatemala

I'm super excited to share this travel opportunity, hosted by Mari of Kakaw Designs, with you. Read on for the details.
Come together to share, learn, and create
Are you a crafty person who likes to make things and who cherishes handmade traditions? I am, too! But I bet our experiences and ideas are different.
That’s the basis of our upcoming Textile Travel for Makers, launching in August 2018. While working with textile artisan communities in Guatemala through my business Kakaw Designs, I’ve come to realize how interested our partner artisans are in learning about different techniques, patterns, designs, and concepts. And ultimately, wouldn’t it be ideal if these talented artisans could themselves take a more active role in the design process, without depending on designers from outside of their communities?
This is the part that I love most about working with artisans: getting excited together about new creations, and trying out new ideas. But I’m just one person, and I only have a small limited number of ideas. That’s why I’d like to invite other creative Makers out there to join us on this new journey of idea exchange in Guatemala.
We’re so excited to share our crafts together – our partner artisans are experts in natural dyes, backstrap weaving, embroidery, making ikat designs, and more. But it’s no surprise that it can be challenging to think outside of the box in the rural context, especially for tactile and visual traditions like in textiles. So, we thought – why not come together and share our ideas in beautiful Guatemala, and have fun while at it?
Our artisan partners are happy to share their traditional craft techniques, and they’re also looking forward to hearing about different experiences and ideas, especially with textiles. We’ll be hosting workshops to facilitate creative idea exchange in a safe space for all of us to come together and take part in a true and real kind of cultural exchange that we can all relate to as Makers.


Who can participate?
Anyone crafty and creative is encouraged to come. Obviously weavers, embroiderers, and seamstresses have a lot to directly contribute to rural artisans, but also I think it's really interesting to hear from people with experience in other techniques that are not prevalent in Guatemala, such as quilting, knitting, block printing, shibori, sashiko, or leaf printing. Skills such as color theory, presentation of products, and simple photography could also all be very helpful, so please feel free to reach out, whether you're an active "maker" or not. I think we all have something to contribute and can learn from each other.
How much will it cost, can what can you expect?
I’ll be leading the small group through Guatemala, together with my mother, Aiko Kobayashi, who has been a textile tour guide for over two decades. We’re excited to add this creative twist, further enhancing both the visitors’ and the artisans’ experiences and making sure that local communities benefit in a meaningful way. We’re currently taking sign-ups for the trip, with two available itineraries starting at only $1800. For more details, please go to our website and/or email me.
Isn’t it great when an idea is just all-around good, benefitting everyone involved? That’s how we feel about this new branch of Kakaw Designs. Supporting our partner artisans even more while at the same time enhancing participants’ travel experiences in an ethical and sustainable way through exchanges based on common interests as Makers of the world. We’re so excited to get our creative juices flowing, together.
Mari Gray
mari@kakawdesigns.com
kakawdesigns.com
